Adobe Commerce (Magento) extension. Merchant Integration Manual
Installation
The extension can be installed from the command line.
See below for instructions.
Command line
SEB extension is available on SEB Support website free of charge.
Installation steps:
- Download and unzip latest Magento 2 module.
- Open “magento/app” folder
- Create folders 3 folders:
Folders structure should be like this…\magento\app\code\Seb\Baltic
- Open “Baltic ” folder which you created in a previous step and copy all content from our Magento 2 module
- Open command line as Administrator
- Go to “magento” folder using terminal
- Enter the following commands at the command line (PHP directory path should be defined if you are using Windows):
- php bin/magento module:enable Seb_Baltic
- php bin/magento setup:upgrade
- php bin/magento cache:flush
When it is production mode also run commands:
- bin/magento setup:di:compile
- bin/magento setup:static-content:deploy
- Proceed to the configuration at Stores/Configuration/Sales/Payment Methods/SEB e-commerce payment solution.
Configuration
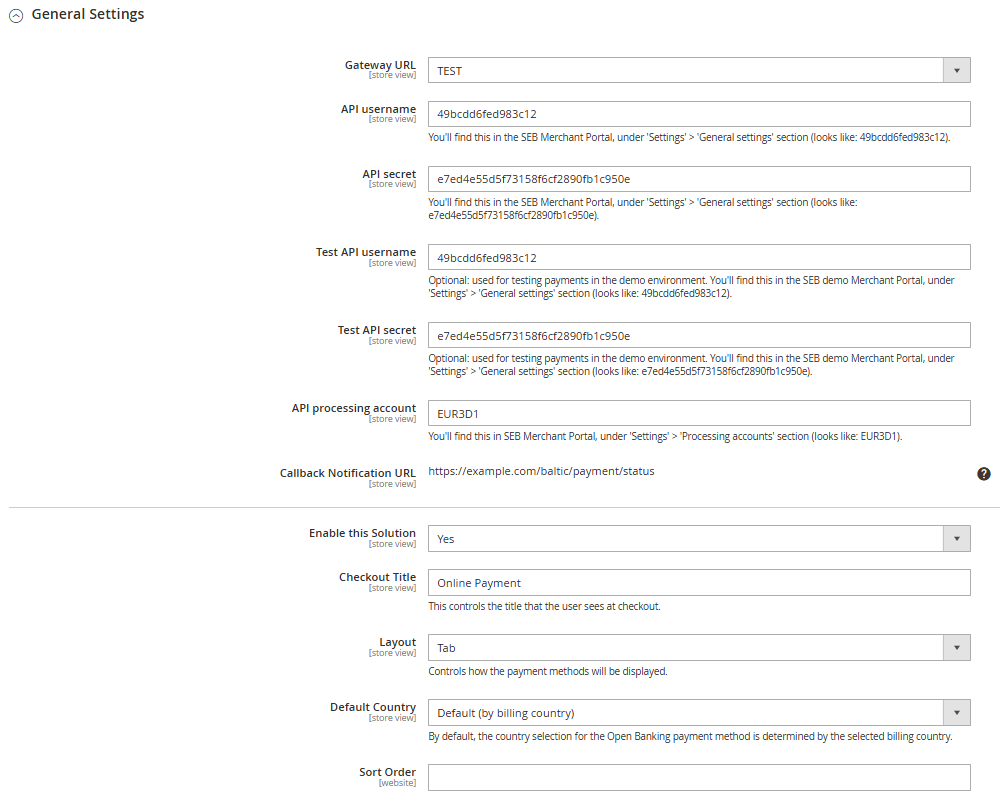
Once the extension is installed, it can be configured via Stores/Configuration/Sales/Payment methods.

Accept Google Pay payments
Note that to accept Google Pay payment on the Web, you need to serve from an HTTPS webpage with a TLS domain-validated certificate.
To accept Google Pay payments:
- From your Merchant portal, go to E-shop Settings
- Choose the right E-shop and go to Google Pay section at the bottom of the page
- Read and confirm Google Pay Terms and Conditions by clicking the checkbox
- In the Google Pay section, there should be: “Accepted” with the date when it is done

If everything is set up correctly, when customers go to the checkout page, the Google Pay payment method will be present.
Accept Apple Pay payments
Contact SEB if you would like to start accepting Apple Pay payments.
The handling of Apple Pay payments in E-shop requires:
- All pages that include Apple Pay must be served over HTTPS
- Webstore domain must have a valid SSL certificate
- Your server is set up for secure communication with Apple Pay. Follow the Apple Pay Guide
- Active registered e-shop in SEB merchant portal
- Enabled card payment method
Preparations:

- Download domain verification file:
- From your Merchant portal, go to E-shop Settings
- Choose the right e-shop and go to Apple Pay section
- Download domain verification file
- Host file’s content to
https://[DOMAIN_NAME]/.well-known/ folder in your website’s root directory
- Corresponding file should be reachable from
https://[DOMAIN_NAME]/.well-known/apple-developer-merchantid-domain-association
- Register webstore domain:
- From your Merchant portal, go to E-shop Settings
- Choose the right e-shop and go to Apple Pay section
- Click + icon and enter your webstore domain or sub-domain where the Apple Pay payment will take place (e.g. example.com, www.example.com etc.)
- Click Add domain
- Check registration status. If the result is correct, the status
registered and the corresponding domain should be displayed

If everything is set up correctly, when customers go to the checkout page, the Apple Pay payment method will be present if an eligible device and browser are being used.
Callback notification set up in merchant portal
For the plugin to work correctly, Callback URL needs to be added in the Merchant portal. Copy the “Callback Notification URL” from the plugin settings and paste into Merchant Portal/E-shop settings/Callback Notification URL field.
Callback notifications are used to inform the plugin about payment status updates. When the payment is finalized by the customer, Callback is sent to the URL that was added in the Merchant portal and a payment status request is made showing the correct payment status to the customer and in the Magento/Orders section.
Please do not add to the Callback-url /ee , /en , /lv etc if your URL changes based on language.