WooCommerce plugin, Merchant Integration Manual
- SEB E-commerce payment solution WooCommerce plugin now supports Google Pay
- Apple Pay
- Adds SEB E-commerce payment solution payment gateway service to WooCommerce for supporting Card, Open Banking and PayPal
- Enables embedding the payment form to the checkout workflow in iFrame for card payments
- Customer Initiated Token (one-click) payment allow returning customers to perform payments faster and easier using saved card details
Requirements
The extension has been tested to work with the following software versions:
- WordPress 5.2.X and above (tested up to 5.2.2)
- WooCommerce 3.6.X and above
- PHP 5.6 or above
However, it’s possible that the extension works even when these are not met.
Installation
SEB E-commerce payment solution is available on Merchant support page, free of charge.
Installation steps:
- Download the latest version from SEB Merchant support page
- Install plugin from ZIP file via WordPress plugin manager
- Go to WooCommerc/Settings/Payments/SEB e-commerce payment solution, enable it and enter your API username and password that can be found in SEB Merchant Portal (see more detailed instructions below)
SEB E-commerce plugin has support for English and Estonian language included, additional translations can be added by translating .pot file found in the “languages” directory or using 3rd party plugin for string translations.
Configuration
Once the plugin is activated configuration options for SEB E-commerce payment solution can be found in WordPress Dashboard, WooCommerce/Settings/Payments/SEB e-commerce payment solution.


Due to the reason that some of the banks do not support 3DS inside the iFrame we recommend choosing “Redirect to hosted form on SEB server” payment integration variant.
Accept Google Pay payments
Note that to accept Google Pay payment on the Web, you need to serve from an HTTPS webpage with a TLS domain-validated certificate.
- To accept Google Pay payments, you must register with Google and receive a Merchant ID, adding the necessary information in Google Pay API section via Google Pay and Wallet Console
- From your Merchant portal, go to E-shop Settings
- Choose the right E-shop and go to Google Pay section at the bottom of the page
- Read and confirm Google Pay Terms and Conditions by clicking the checkbox
- In the “Google Pay Merchant ID for Custom Domains” field enter the Google Merchant ID obtained from the Google Pay for Business console and press “Save” (in the test environment, a random value can be entered)
- In the Google Pay section, there should be: “Registered” with Google Pay Merchant ID and the option to “Unregister”
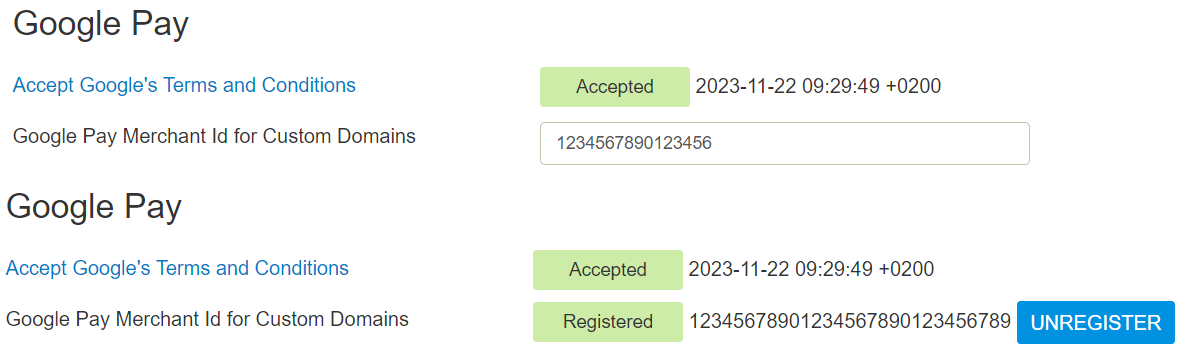
If everything is set up correctly, when customers go to the checkout page, the Google Pay payment method will be present.

To initiate a Google Pay payment in the test environment, just add a genuine card to your Google Wallet. You can relax knowing that no funds will be deducted, as a red notification will inform you – Your payment method won’t be charged because you’re in a test environment.
Accept Apple Pay payments
Contact SEB if you would like to start accepting Apple Pay payments.
The handling of Apple Pay payments in E-shop requires:
- All pages that include Apple Pay must be served over HTTPS
- Webstore domain must have a valid SSL certificate
- Your server is set up for secure communication with Apple Pay. Follow the Apple Pay Guide
- Active registered e-shop in SEB merchant portal
- Enabled card payment method
Preparations:
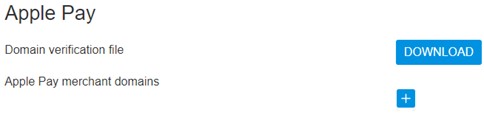
- Download domain verification file:
- From your Merchant portal, go to E-shop Settings
- Choose the right e-shop and go to Apple Pay section
- Download domain verification file
- Host file’s content to
https://[DOMAIN_NAME]/.well-known/ folder in your website’s root directory
- Corresponding file should be reachable from
https://[DOMAIN_NAME]/.well-known/apple-developer-merchantid-domain-association
- Register webstore domain:
- From your Merchant portal, go to E-shop Settings
- Choose the right e-shop and go to Apple Pay section
- Click + icon and enter your webstore domain or sub-domain where the Apple Pay payment will take place (e.g. example.com, www.example.com etc.)
- Click Add domain
- Check registration status. If the result is correct, the status
registered and the corresponding domain should be displayed

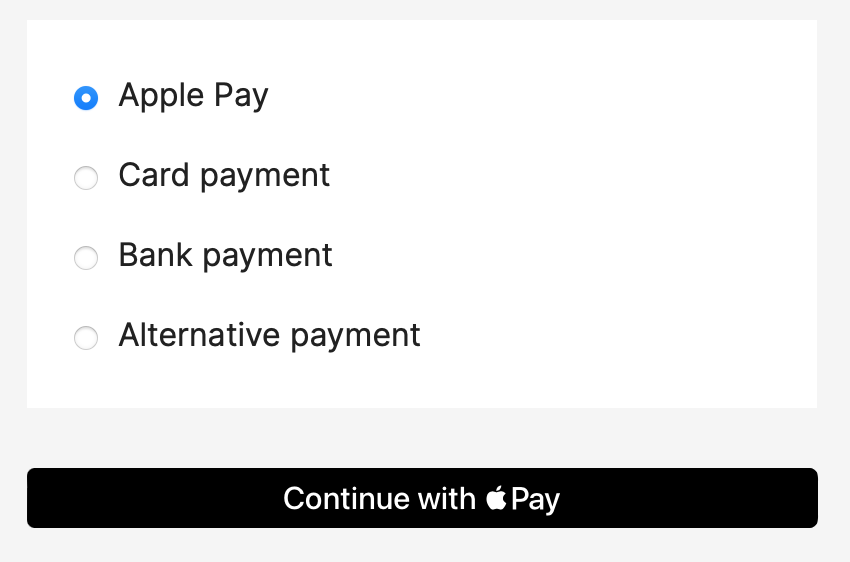
If everything is set up correctly, when customers go to the checkout page, the Apple Pay payment method will be present if an eligible device and browser are being used.
Callback notification set up in merchant portal
For the plugin to work correctly, Callback URL needs to be added in the Merchant portal. Copy the “Callback Notification URL” from the plugin settings and paste it into the Merchant Portal/E-shop settings/Callback Notification URL field.
Callback notifications are used to inform the plugin about payment status updates. When the payment is finalized by the customer, Callback is sent to the URL that was added in the Merchant portal and a payment status request is made showing the correct payment status to the customer and in the WooCommerce/Orders section.
| Field name |
Description |
| Enable/Disable |
Activate SEB E-commerce payment solution as an option in
checkout. |
| Gateway URL |
LIVE – live/production mode (payments are sent to SEB production server).
TEST – test mode (payments are sent to SEB test/demo server). |
Callback Notification
URL |
Add this URL to Callback Notification URL in SEB merchant portal under eshop settings. |
API username / test API
username |
SEB Production(Live) and Test servers have different API credentials.
API settings are defined in SBE Merchant Portal
PRODUCTION(LIVE):
https://portal.ecommerce.sebgroup.com/merchant_settings/general
TEST:
https://mwt-seb-demo.every-pay.com/merchant_settings/general
Looks like this (16 symbols): 68d9463b47d9a364 |
API secret /test API
secret |
SEB Live and Test servers have different API credentials.
API settings are defined in SEB Merchant Portal
LIVE:
https://portal.ecommerce.sebgroup.com/merchant_settings/general
TEST:
https://mwt-seb-demo.every-pay.com/merchant_settings/general
Looks like this (32 symbols):
53bac7aa8131d21671b6f2fb15de2ce4 |
| API Account Name |
Processing accounts are defined in SEB Merchant Portal.
LIVE:
https://portal.ecommerce.sebgroup.com/merchant_settings/currency_facilities
TEST:
https://mwt-seb-demo.every-pay.com/merchant_settings/currency_facilities
Looks like this: EUR3D1 or USD3D1 |
Update Payment
Methods |
Can update payment methods manually |
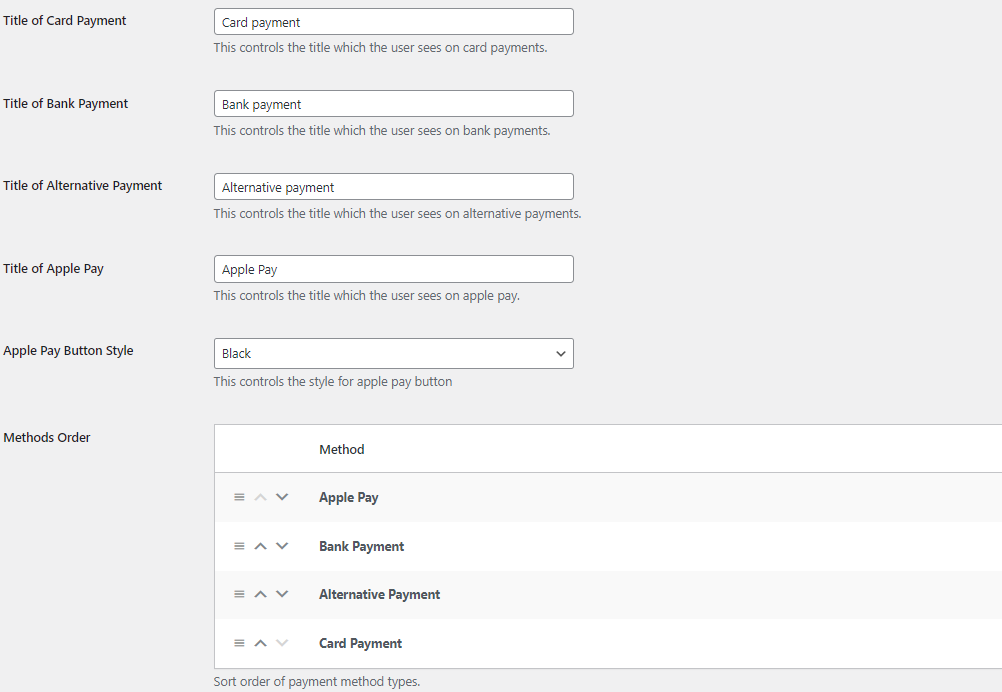
| Title of card Payment |
This controls the title which the user sees on card payments. |
| Title of Bank Payment |
This controls the title which the user sees on bank payments. |
Title of Alternative
Payment |
This controls the title which the user sees on alternative payment methods (PayPal etc). |
| Title of Apple Pay |
This controls the title which the user sees on Apple Pay payment method |
| Apple Pay Button Style |
Choose how to display Apple Pay button and style based on Apple guidelines, possible options “Black”, “White”, “White with outline” |
| Methods Order |
Sort in what order the payment methods will be displayed on the checkout page |
Payment Integration
Variants |
Select “Redirect to hosted form on SEB server” to delegate most of security to SEB or “iFrame payment form integrated into checkout” to show payment form inside your checkout flow and provide a more user-friendly shopping experience. Using SSL (https://) is strongly advised for iFrame form as user expect see green padlock on browser’s address bar when entering private information |
| Default country |
By default country selection is attempted by currently active locale. When some country is selected it ignores the language and shows always the selected country open banking payment method first. |
| Saved cards |
Enables one-click-payments which allows returning customers to save their card details (a reference token to required card information in SEB system) for faster and easier payments in the future. |
| Debug Log |
Allows logging of payment process steps in detail. Transactions are logged always. |
Version history:
| Date |
Change |
| 06.01.2021 |
New version: 1.3.4
Bug fix for sent for processing status.
|
| 01.03.2021 |
New version: 1.3.6
Added possibility to upload plugin using Multisite.
Bug fix: Shop shows incorrect payment status in case of some settled payments. Removed 10 minute time limit for payment links on plugin side. |
| 28.04.2021 |
New version: 1.3.7
Fix: Show only one payment status for the customer. |
| 25.04.2023 |
New version: 1.3.12
Fix: compatibility with PHP 8.x
Features:
- Apple Pay
- name of the payment method that was used
- payment method sorting
|
| 01.08.2023 |
New version: 1.3.13
Fix: WooCommerce HPOS (High-Performance Order Storage) compatibility |
| 23.01.2024 |
New version: 1.3.14
Fix: Apple Pay flow changesFeatures:
|
| 26.04.2024 |
New version: 1.3.15
The available payment methods are verified based on the total amount on the checkout page and displayed according to the limits configured in the Merchant portal
|
| 03.09.2024 |
New version: 1.3.16
Billing state validation removal, small bug fixes |